
How to create an efficient layout for your homestead

Starting a homestead comes with a lot of questions, especially the big one: "What goes where?"
It's all fun imagining your ideal homestead, but when it comes down to actually organizing where each piece fits (your garden, food forest, animals, compost area, etc.) the task can suddenly seem overwhelming.
Where you place the elements on your homestead isn't a decision to take lightly.
It can mean the difference between a smoothly running homestead and one that feels like you're constantly battling against your land.
One of the biggest obstacles is simply not knowing where to start.
Without a clear plan, you might end up with your vegetable garden at the edge of your property, instead of close to your house.
Every time you need to grab a few veggies, it turns into a mini-marathon.
Or imagine needing to move your animals' feed across the property every day because the storage area was placed without considering the daily flow of activities.
These are just some small examples, but it’s these everyday inefficiencies that can turn the joy of homesteading into a grind.
This lack of strategic planning can complicate your daily routine, making tasks harder than they need to be.
Fortunately, creating the layout of your homestead doesn’t have to be complicated.
In this article, we’re going to turn the question "What goes where?" into a simple plan.
For this, we’re going to need a strategy called “Permaculture Zones”.
What are zones in Permaculture exactly?
If you’re scratching your head wondering what that’s all about, it’s essentially a way to plan out where everything goes on your property based on two simple ideas: how often you need to use something and how much care it needs.
Basically, the elements you use all the time or need to have daily care should be closest to your house.
This makes it easy and efficient to get to and means you won't waste energy walking across your land for everyday tasks.
On the flip side, things you don't use much or that pretty much take care of themselves should be further out.
This will make your life easier and keep your homestead running smoothly without unnecessary work.
For example, your kitchen garden with all the herbs and veggies you use daily should be close to your home.
If it was way out of sight, you'd probably use it less and it'd be a hassle to maintain.
Same for your chicken coop.
The chickens need daily care and provide you with fresh eggs.
You might even visit the chickens twice per day.
That is 730 times walking back and forth in a year.
It only makes sense to place them in zone 1 or zone 2.
Compare that to a walnut tree, which you might visit only a couple of times per year (zone 4).
Zoning helps us figure out how to use our space efficiently, based on how we move around and what we do in those spaces.
The idea is to create a setup where your land is broken down into areas numbered 1 to 5.
Let's go over what each one looks like on your homestead.
Zones 1 to 5 on your homestead
Zone 1: The daily use area
Zone 1 is essentially your homestead's front yard, the area you interact with multiple times a day.
It's where convenience is key.
You'd typically find your kitchen garden here, full of herbs and vegetables that you frequently use in cooking.
Having these so close means you can quickly grab what you need while preparing a meal.
This way, you always have fresh ingredients at hand.
Another common feature in this zone might be small livestock, such as chickens, for easy access to eggs.
A compost bin for kitchen scraps could also be located here, making it simple to manage daily waste.
The idea is to keep the maintenance-heavy and frequently visited elements within easy reach, reducing the need for long trips across your property.
Having things close by not only speeds things up but also keeps you motivated to take care of them, as they’re always in view.
Zone 2: Semi-intensive management area
Moving slightly away from the house, Zone 2 is where you have elements that require regular attention, but not as much as in Zone 1.
This might include a small orchard of fruit trees that need periodic maintenance or a perennial garden that provides a variety of yields throughout the season.
These areas benefit from being within a comfortable walking distance but don’t need the constant oversight that Zone 1 elements do.
Beehives are also ideal for this zone, providing pollination for your garden and orchard while producing honey.
The key with Zone 2 is balancing accessibility with the slightly reduced need for everyday care.
Zone 3: The broad-scale agriculture zone
Zone 3 is where your homestead begins to feel more like traditional farming, with larger plots dedicated to staple crops and spaces for managing livestock.
This zone is designed for efficiency in larger-scale food production and animal care, with visits and maintenance being less frequent compared to the intensive care of Zones 1 and 2.
In this zone, you might plant your staple crops such as pumpkins or potatoes, alongside larger fruit trees that require more space to grow.
It's also the perfect area for animal shelters for livestock that don't need daily attention, like sheep or goats.
This is also the place where you can include water storage systems, such as ponds or dams, and forage areas for grazing livestock.
Personally, we have our food forest in this zone.
Zone 4: Managed wilderness
Zone 4 is a transitional area blending managed land with the natural environment.
It serves multiple purposes, from forestry and pasture to water management and wildlife habitat.
This zone is characterized by a mix of use and conservation, where human activities are balanced with ecological preservation.
Forestry operations in Zone 4 focus on timber and firewood production, often through methods like selective cutting to maintain ecosystem health.
This is where we personally plan to set up a big nut grove (walnuts, chestnuts, almonds, etc.) and bring an old olive grove back to life.
Pastures can easily extend into this area.
Often a great strategy is to let grazing animals rotate through these areas.
Especially before and after harvesting the ripe nuts and fruits.
This way, they get to eat all the fallen fruits, while cleaning and fertilizing the land.
The dams and water features in Zone 4 play a big role in keeping water on the land (for fire protection, drinking source for animals, and even for wildlife).
Zone 5: The wild untouched
The outermost zone, Zone 5, is left entirely to nature.
This area is untouched, allowing ecosystems to function without human intervention.
It serves as a place for observation, reflection, and the enjoyment of natural beauty.
It’s also an essential learning space, where the natural processes provide insights that can be applied throughout the rest of the homestead.
Zone 5 can act as a gene pool for beneficial plants and animals, offering opportunities for conservation and habitat for local wildlife.
It reminds us of the importance of coexisting with nature, providing a vital link between your homestead and the broader ecological network.
When laying out your homestead zones, there are a couple of key things to keep in mind:
1. Not all properties will have all five zones, and they are rarely arranged in neat, concentric circles around the house. The layout of zones on your land depends on several factors including topography, access from the house, and your specific needs and capabilities.
As you can see in the example below, our property doesn’t have a zone 5:
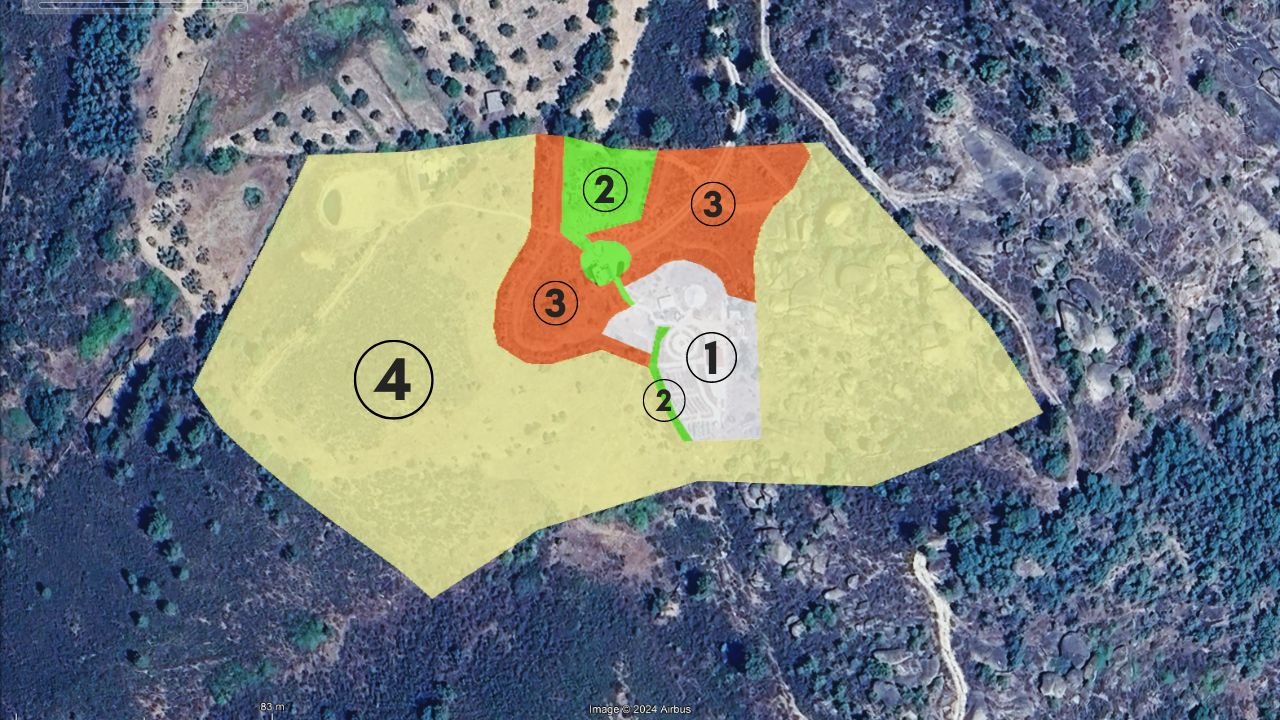
2. Zones are conceptual. This means that you won’t necessarily see fences or walls marking the different zones on your land. They can, however, change at physical borders (like fences, roads, pathways, etc.)
3. Zones on your homestead don't have to be directly next to each other, nor do they need to follow in numerical order from Zone 1 to Zone 2 to Zone 3, and so on. You might design your homestead in a way that brings a part of Zone 5, such as a wildlife-watching area, in direct contact with Zone 1, right next to your house. This kind of planning allows for unique interactions with the natural environment, even from the comfort of your home.
In our case, we have our zone 1 right next to zone 4 (although, we’re going to turn much of that into zone 5):

4. It's entirely feasible and often necessary to have several areas designated as the same zone number spread throughout your homestead. These zones, although not physically connected, share the same level of priority and care requirements. For example, you might have two areas dedicated to moderate-maintenance activities or resources.
On one side of the property, you can have your poultry, and on the other side an intensively managed small food forest:

By setting up your homestead with these zones, you're laying out a plan that suits your daily routine.
If you can put things where they work best, you're not running around more than you have to.
You get to do less work, or at least, be much more efficient, and get more done while having fun doing it.
This way of organizing your homestead makes sure that every bit works together.
Now, let's dive into how you can bring this plan to life, step by step.
Practical steps to design your homestead layout in zones
Step 1: Understand your needs and daily habits
Start by really looking at how you move around and use your space every day.
What paths do you take most often? Where do you spend your time outside?
Make a list of what you want to have on your land, like where you might want a garden for your veggies, a relaxation area, or an area for fruit trees.
Match your homestead layout with your daily life and goals.
Step 2: Analyze your land
Take the time to watch how the sun moves across your property, where the wind tends to come from, and how water flows during rain.
Look at the big trees, hills, or buildings that are already there.
This step helps you understand the natural setup of your land, so you can work with it, not against it.
I’ve written an article on land assessment here.
Step 3: Sketch a rough map
With a pencil and paper, or simply Google Earth Pro, start sketching your property and mark out where you think different zones could go, based on what you've observed and your daily needs.
It doesn’t have to be perfect or to scale.
This step is about getting your ideas down and starting to see how your homestead could be laid out.
Step 4: Add elements into your zones based on analysis
Now, take your zoned map and begin to place specific things within those zones.
Put your everyday herbs and veggies in Zone 1, where you can get to them easily.
Zone 2 could have your fruit trees that don't need daily care but still need to be checked on regularly.
Keep assigning items to zones in this way, making sure everything is placed logically based on how much attention it needs and how often you’ll use it.
This organized approach means your homestead will be set up to support the way you live and work in the most practical and efficient way.
Takeaway
Zoning is a great design method for organizing your homestead.
It's a way to bring clarity to an often challenging obstacle: not knowing what goes where and how to create an effective layout.
It helps with making every part of your property contribute to an efficient system, reducing unnecessary effort and maximizing productivity.
Of course, zoning is just a small part of designing your homestead.
There's a lot more to consider, but, that’ll be for another day.
Thank you for reading this article.
I hope it was helpful.
See you soon,
Moreno
Whenever you're ready, and if it's the right fit, here are 4 ways I can help you:
1. Join Abundance by Design: Abundance by Design teaches you exactly how to plan, design, and start your homestead in 2 weeks or less using Permaculture. Learn how to achieve a level of self-sufficiency that gives you peace of mind, along with a well-structured plan that lays out the 'do this, then that' to get your homestead up and running smoothly.
2. Year-Round Vegetables - The Garden Planner: Learn how to turn your garden into a year-round grocery store. This course will teach you step-by-step how to create a garden plan for year-round vegetables that are aligned with your climate, food preferences, and garden size.
3. The Reconnected Newsletter: Sign up to receive my free weekly newsletter where I share practical tips to grow your independence & freedom from first seed to self-sufficiency, directly to your inbox.
4. The Homestead Startup Checklist: Download our free, step-by-step checklist you can use to plan, design, and start your homestead from scratch (following our ‘Abundance by Design Framework’).